How to Transfer File & Folder Ownership in Google Drive™
Need to hand over ownership of files or folders in Google Drive, especially when you need to do it for hundreds or even thousands of items. Whether you’re offboarding employees, reorganizing projects, or handing over control to a new manager, doing it manually in Google Drive isn’t scalable.
In this guide, we’ll walk you step by step through how to transfer ownership using Folgo, so that the right person holds the reins without losing access or metadata.
Why Transfer Ownership?
When someone leaves a team, changes roles, or you want to reorganize who controls certain files or folders, transferring ownership is safer than merely sharing or copying. With Folgo, you can:
- Transfer entire folders (and their contents) at once
- Maintain file metadata (timestamps, comments, history)
- Automate what would otherwise be a tedious manual process
Important Notes
Before you begin, keep in mind:
- The transfer ownership process is best suited for Google Workspace users within the same domain. Transfers across domains may face restrictions.
- Transfers from a Gmail (personal) account to a Workspace account (or vice versa) often aren't permitted.
- If a file’s sharing settings prevent copying or duplication, Folgo may be blocked from transferring it. You may need the current owner to loosen restrictions first.
- The person you invite to own the file or folder must accept your request to complete the transfer. The pending owner can decline. the request.
- If you transfer ownership of a lot of files and folders at once, it may take some time for you to see the changes.
Step 1: Install Folgo
The first step is to install Folgo from Google Workspace Marketplace.
It's a quick installation procedure. Once installed, you can access Folgo, right within the sidebar of your Google Drive.
You can also install Folgo from your Google Drive by clicking on the "+" button in the side panel. Click on the Folgo icon in your Google Drive sidebar to launch the app.

Step 2: Launch the Transfer Tool
To launch Folgo, go in Google Drive, and click on the Folgo icon on the sidebar which can be found on the right side of your screen.
Once Folgo is open, click on Transfer / Request Folder ownership.

Step 3: Select the folder to transfer
You will see a prompt saying "👈 Select a folder to transfer".
The 👈 pointing finger prompts you to choose a source folder within Google Drive directly (and not in the Folgo sidebar). Navigate and select the folder you want to transfer.
Once selected, the Folgo UI will update and display your chosen transfer folder.
Step 4: Enter the recipient's email address
In the New owner email field, enter the transfer recipient's email address.
Note: Transfer ownership is only possible between:
- (Personal) Gmail to another (Personal) Gmail account
- Google Workspace to another Google Workspace account
- Transfers from (Personal) Gmail to Google Workspace accounts or vice versa, are not possible.
You got multiple options. Depending on your needs, choose:
- Folders & Files - if you want to transfer both folders and files.
- Folders only, if you want to transfer only folders.
- Files only - if you want to transfer only files.

Step 5: Initiate the transfer process
When you’re ready, click on the TRANSFER button to initialize the transfer process. Once the transfer process is started, you can opt to close Folgo, Google Drive, your browser, or your computer. This is possible and safe because Folgo will process everything using Google servers (operating behind the scenes).
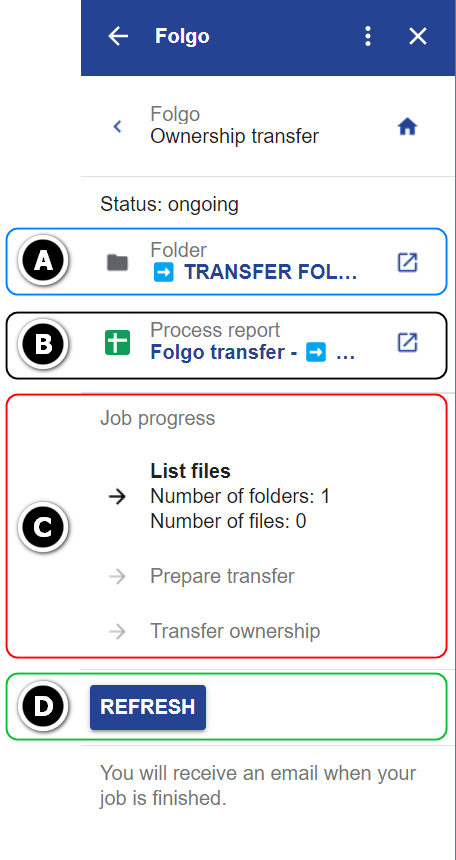
During the transfer, the Folgo UI will change and display: Selected transfer folder.
- A. Selected transfer folder
- B. Supplementary Process Report (Inspection/Audit report) that contains all your files and their metadata. Only open this when the transfer is complete and do not edit while the transfer is ongoing.
- C. The Transfer Status Report (Job progress).
- D. The REFRESH button.
(Optional) Click REFRESH if you want to check the current status of the transfer process. If you decide to refresh the status, this may take a while and the duration will depend on the number of folders/files that are being transferred.

Step 6: After the transfer
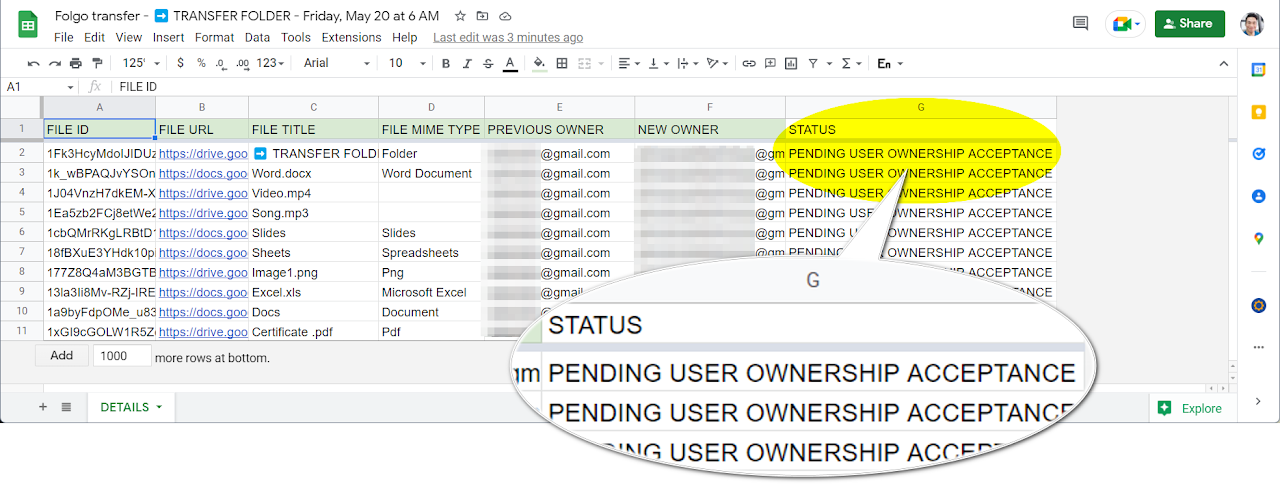
Once the transfer request is finished, you can open the Process report.
The transfer process is handled differently between a Personal Gmail or Workspace account.
- Between 2 personal Gmail accounts:
When you open the Process report, you will see that the status is set to PENDING USER OWNERSHIP ACCEPTANCE, indicating the Pending Owner needs to accept the file transfer request. See the next section for details.
Notes:
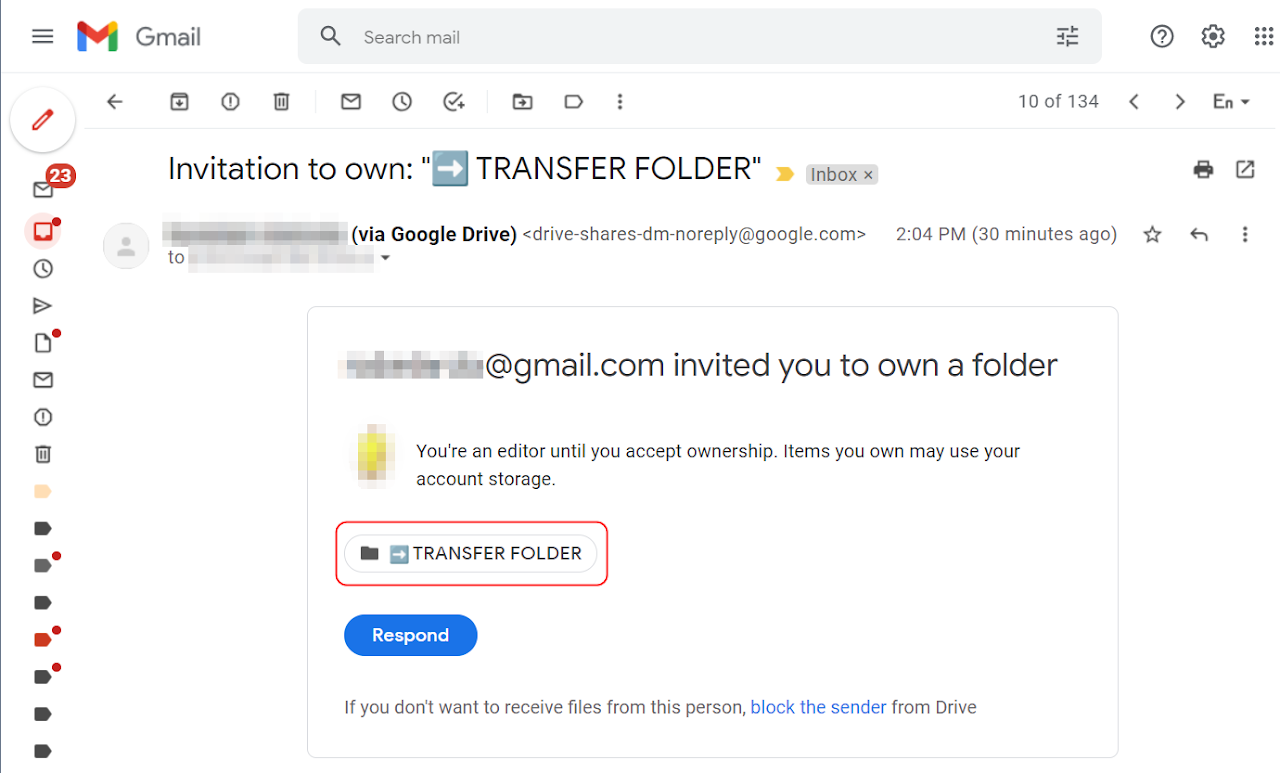
-The pending owner is notified by email that if they accept the transfer request, they become the file owner. Until then, you remain the owner.
-The pending owner is upgraded to an Editor, unless they’re already an Editor.
-If the pending owner accepts, you’re downgraded to Editor. The new owner can remove you.
-If the pending owner declines, you remain the owner.

- Between 2 Workspace accounts:
There will be no Pending status for Workspace users since the files are automatically transferred to the New Owner. They will only receive an email notification titled "You're now the owner of <TRANSFERRED FOLDER>".
Steps for the Pending Owner (Gmail accounts)
You will get an email when someone requests a file transfer. You can accept or decline the invitation.
-These files/folders will be sent as individual emails titled Invitation to own: "<FOLDER / FILE NAME>"), allowing the recipient to open the folder and files to accept the transfer ownership.
-In Google's effort to protect Personal Google Account (Gmail) users, the Pending Owner (recipient) must explicitly accept all folders/files that were transferred to them.

Tip: You don't need to open each invitation to accept or decline them. We will show you a simpler way to do this efficiently.
- Enter or type this query in Google Drive's search bar: pendingowner:me or from xxxxx pendingowner:me (xxxxx is the email address of the current owner).
- Click the Share button to accept or decline the files with pending ownership at once.
Conclusion
Transferring file ownership in Google Drive manually is slow and limited but with Folgo, you can do it at scale, safely, and automatically. Folgo gives you the power to transfer ownership across entire Drive structures effortlessly, making it the ultimate solution for IT admins, Workspace managers, and business leaders who need control and visibility.
Install Folgo and give it a try! We only showed one of many powerful features Folgo offers to help you manage Google Drive at scale. Feel free to explore Folgo's features and see how it helps your organisation!


